Tuesday, June 30, 2015

A UFO of Gastronomic Porportions

*I received this product free for reviewing purposes. All opinions are 100% my own*

In addition to being a beauty blogger I'm also a huge foodie. Food and lipstick, two of my favorite things. Now being a lover of food means sometimes I have a err....few more pounds on my hips than I'd like. Cupcakes man, they go straight to my butt. So in an attempt to eat healthier I've been looking at alternative ways to cook my veggies other than sauteed with butter and garlic, and when I was offered  chance to test out Sunsella's vegetable steamer I though this would be a match made in healthy food heaven.


First, can we all agree that this thing looks like a flying saucer when it's closed up? I actually have to hide this from my son because he thinks it's a space ship toy. In case you have no idea what a vegetable steamer is, this is kind of like a metal strainer you put into a pot with like an inch of water in it. The steamer hold the veggies up out of the water so they are cooked by the hot steam. More nutrients are preserved, everybody is happy. It hold enough for my family of three, but if you wanted to do a large batch you'd have to do several rounds.


Once opened up it was really quite large, and fit my large pot just fine. I think you could only halfway open it and put it into a medium sized pot, but I haven't tried that. The little ring makes it easy to lower into my pot and remove it once I'm done cooking. The only thing I didn't like are the metal prongs that keep the steamer above the water. I wish they were coated in silicone, I'm worried the prongs are going to scratch up my coated pots with repeated use. But other than that I liked it a lot. I haven't tried anything but veggies on it, but I imagine I could do dumplings and maybe even some fish fillet if they were on the smaller size like the tilapia I happen to have in my freezer.

With summer here are farmer's markets on every corner now is the time to enjoy some lighter, healthier fare. Or even steam and freeze fresh produce to enjoy later in the winter. For $13.99 with free Prime shipping, I think this is a good deal and really makes it easier to eat healthier. I'm trying to figure out how to cook an entire meal at one with it, which I think would be brilliant and so time saving.


This is actually the third time I wrote this post, so I apologize if it seemed shorter than my usual reviews. Blogger ate the draft as I was trying to publish it, and I scrapped a draft that really sucked, so this is what I ended up with. Add it lighting and camera issues and these are the makings of a frustrated blogger.

Monday, June 29, 2015

4th of July Mani Monday

Wow, can you believe 4th of July is right around the corner? We have big plans this year for the 4th, so I wanted a really fun manicure to go with it. So I came up with this fun and easy design that anybody can do, so let's get started.


To do this manicure you will need:

  • White nail polish
  • Red nail polish
  • Blue nail polish with some glitter in it
  • Cosmetic wedge
  • Dotting tool
  • Clear top coat
  • Optional: nail strengthening base coat
  • Nail polish remover and q-tips to clean up your edges

First apply the nail strengthening top coat if you are using it, then the white polish. I did two coats of the white, which was a little thick for some reason. I'm thinking the heat and humidity we've been having is affecting my polish collection. Wait for the white polish to dry all the way before moving onto the next step.


Now apply some of your blue polish to the edge of the cosmetic wedge, them sponge it over the tips of your nails. This not only gives a gentler color but softens your edges. I did two layers just to make sure it was even, but I probably could have just done the one. Wait for this to dry completely before moving onto the next step.


Using your dotting tool, apply red dots into the white part of your nail. You can do a mix of big and small, a lot or a little, whatever looks good to you. I did a lot and a mixed sizing. Let this dry all the way again.

Now top your nails with the clear top coat, then clean up the polish from your skin with some remover and q-tips. Now sit back and admire your red, white, and blue artwork while sipping some cool water because it is HOT out!

Thursday, June 25, 2015

Thursday Thoughts

The end of the month is near, and the scorching hot weather has begun in my neck of the woods. As per my usual I am joining Jen of Ramblings of a Suburban Mom for her weekly Thursday Thoughts Link Up.


As I briefly mentioned, it is officially hot here. Today should hit 94 degrees, and it'll be 100 degrees this weekend. I live in the Pacific Northwest, so this is not our usual thing. I may flee to the coast with the family or to a lake a friend just told me about. This is a week to test out some melt proof makeup that's for sure.


I am busting through some of my makeup lately, look at how little is left in this Rimmel Stay Matte powder. I've repressed it once already and I'll probably do it again this weekend. Trying to "shop my stash" instead of buying new stuff lately, mainly because I want to finish things before they go bad. Speaking of finishing stuff up, my Project Pan Spring 2015 is done!! I didn't finish the lipstick and remaining eyeliner, but they are super close to being done. I'll do a brief post about it later this week as a bonus post, but for right now I'm super happy with how much I used up and I will for sure start another Project Pan in the fall. Right now I'm just enjoying having more variety in my makeup.


I really need to do another makeup tutorial, I had so much fun doing the last one and I've been really expanding my makeup skills lately. This was my eye look from yesterday and it was so pretty I had to share it. What style of makeup would you guys like to see a tutorial on? If I had a portable mirror and a good location to do it I'd film one but for now I'll stick to photos.


In case you were curious what I got with that $10 rewards card from Ulta, here's my little haul. I picked up another tube of my favorite BB Cream, then I decided to test out the Baby Skin Primer and the Baby Lips lip balms. I haven't tried the primer yet but those lip balms are the balm you guys, like I need 100 more stat. The pink one smells like candy, I want to eat it every time I apply it. I'll do a full review of them later, but for now I'm very pleased with my purchases.

Wednesday, June 24, 2015

Grown Up Temporary Tattoos

*I received this product free for testing purposes. All opinions are 100% my own*


Hi guys, I know I've been pretty MIA lately, sorry about that. There's a lot of stuff going on in my personal life and I really just didn't have the energy to sit down and write. I'm back on track though and ready to review one of the funnest products I've ever been sent. Flash tattoos are metallic tattoos in what I could call adult designs. Many of the more popular designs are meant to mimic jewelry, making them great for summer time or parties where you don't want a heavy necklace bouncing around.


I will be the first to admit that I've turned down several offers to review flash tattoos, I always found them cheesy for some reason. But some of the designs that Veyo Life offered were really great looking so I agreed, figuring worst came to worst my son would enjoy them. I'm so glad I agreed to try these because I love them and wear them all the time now. The Veyo Life set is a pack of ten sheets with different designs on each page ranging from peacock feathers, to jewelry looking pieces, to some really fun beach designs. The whole pack is $21.99, with free Prime shipping, so just over $2 a sheet. Each sheet is about the size of half a sheet of paper, so I believe you get around 120 tattoos total, which is quite a lot of shiny tattoos.


These apply just like the temporary tattoos you get in the 25 cents machines, you cut it to size, peel the plastic part off, stick it to your skin, then wet and apply pressure for about 20 seconds. I never had a problem applying these, and they all came smoothly off the sheet. As far as lasting time it depends on what you are going to do. Things like the pool, sweating, and lotions/sunscreens will greatly reduce the lifespan of them. I think the longest any of the ones I tried lasted while still looking good was 3 days (on my chest), which is pretty decent. Obviously the ones I applied to my hand and fingers were gone by the end of the day thanks to hand washing, but they looked really neat all day.


I've been wearing these out and about since I first got them and I get so many compliments on them, way more than when I just wear jewelry. These really are the perfect summer accessory, and I would buy them again in a heartbeat. I think this particular brand has the widest selection of designs that I've seen so far, so I think there is something in here for everybody. And with pool parties and music festivals right around the corner these would be a great investment.


If you want to see more of how I wear and style these tattoos, make sure you are following me on Instagram. If you've tried flash tattoos, let me know in the comments what you think of them


Thursday, June 18, 2015

Thursday Thoughts

Ah Thursday, the sign that my week is almost over. Just one more work day and then I actually get to spend time with my Husband and do extra fun activities with my kiddo. As per my usual I'm linking up with Jen of Ramblings of a Suburban Mom for her Thursday Thoughts.


For those keeping track, the end of my Project Pan Spring 2015 is quickly coming to an end. The first official day of summer is June 21st, so just a few more days to get as much done on my two remaining products. I may finish the eyeliner, but there's no way I'll finish that lipstick in time. I've made some incredible progress though and I finished a ton of products, so even if I don't finish the last two I'm super pleased with how my Project Pan turned out.


I've been on a bit of a no buy lately, both to save some money and to use up products I already own. I discovered the other week that my HD Blushes by ELF Cosmetics were drying up, so I'm trying to use everything in my makeup collection at least once this month to make sure nothing else is going bad. Because I'm actually using stuff I'm hitting pan on lots of items, which is exciting. This week along I've hit pan on the bronzer in the photo, an eyeshadow, and I rehit pan on my powder foundation that I repressed. Shopping your stash can be fun, you discover things you forgot, like the lipstick I was rocking yesterday, or you discover that a particular Dove body wash gives you a rash. I will have to make a run to Ulta this weekend to use the $10 rewards card they sent me, so I'll probably make that my only shopping trip till July. Unless someone wants to give me a gift card.


Speaking of Ulta, did anybody else get a $10 rewards card from Ulta this week? Stuff like this is one of the many reasons I love Ulta and you need to sign up for their FREE rewards program. I get so much awesome stuff from them like this, and their customer service at my store has always been fabulous. I am a loyal customer for life.

If you are on my Facebook page you might have seen my teaser about a neat monthly feature I'm planning. The concept of a monthly face challenge sounds really fun to me, so I'd like to do a series of single brand total face looks. So an all Maybelline face, or a look created just from Dollar Store finds. Something to challenge both myself and the brands I review. I'll start this in July with a Dollar Store face, which sounds both super fun and terrifying at the same time. But whatever the brand my goal is to keep the total to under $40, which I think is a budget most people can handle.

Father's Day is this Sunday, and I'm woefully unprepared. I need to figure out something neat for my husband, who is such a great father. One year I made matching shirts for him and our kiddo, thinking that might be fun to do again. Or maybe let the bug paint him a shirt, that'd be nice right? The kid's class I work with is doing mugs for the dads, so he'll be getting a mug at least. Holidays are so hard sometimes, what are you getting the dads in your life?

Wednesday, June 17, 2015

June 2015 Birchbox


I consider my monthly Birchbox my little monthly present. Sometimes it's awesome like the presents I give myself, and other times it's truly awful like that sweater your Aunt gave you one Christmas. How did June's Birchbox rank on the present scale this month? Let's just dive right in and see what I got. But first I need to apologize for my terrible pictures this month, the lamp I use for lighting is not working anymore. Thought the bulb was dead, stuck a new one in and now it works but gets crazy hot. Pretty sure if I continue to use it I'll set my living room on fire. Which would be exciting I guess, but I really don't have the time to deal with that level of mess right now.


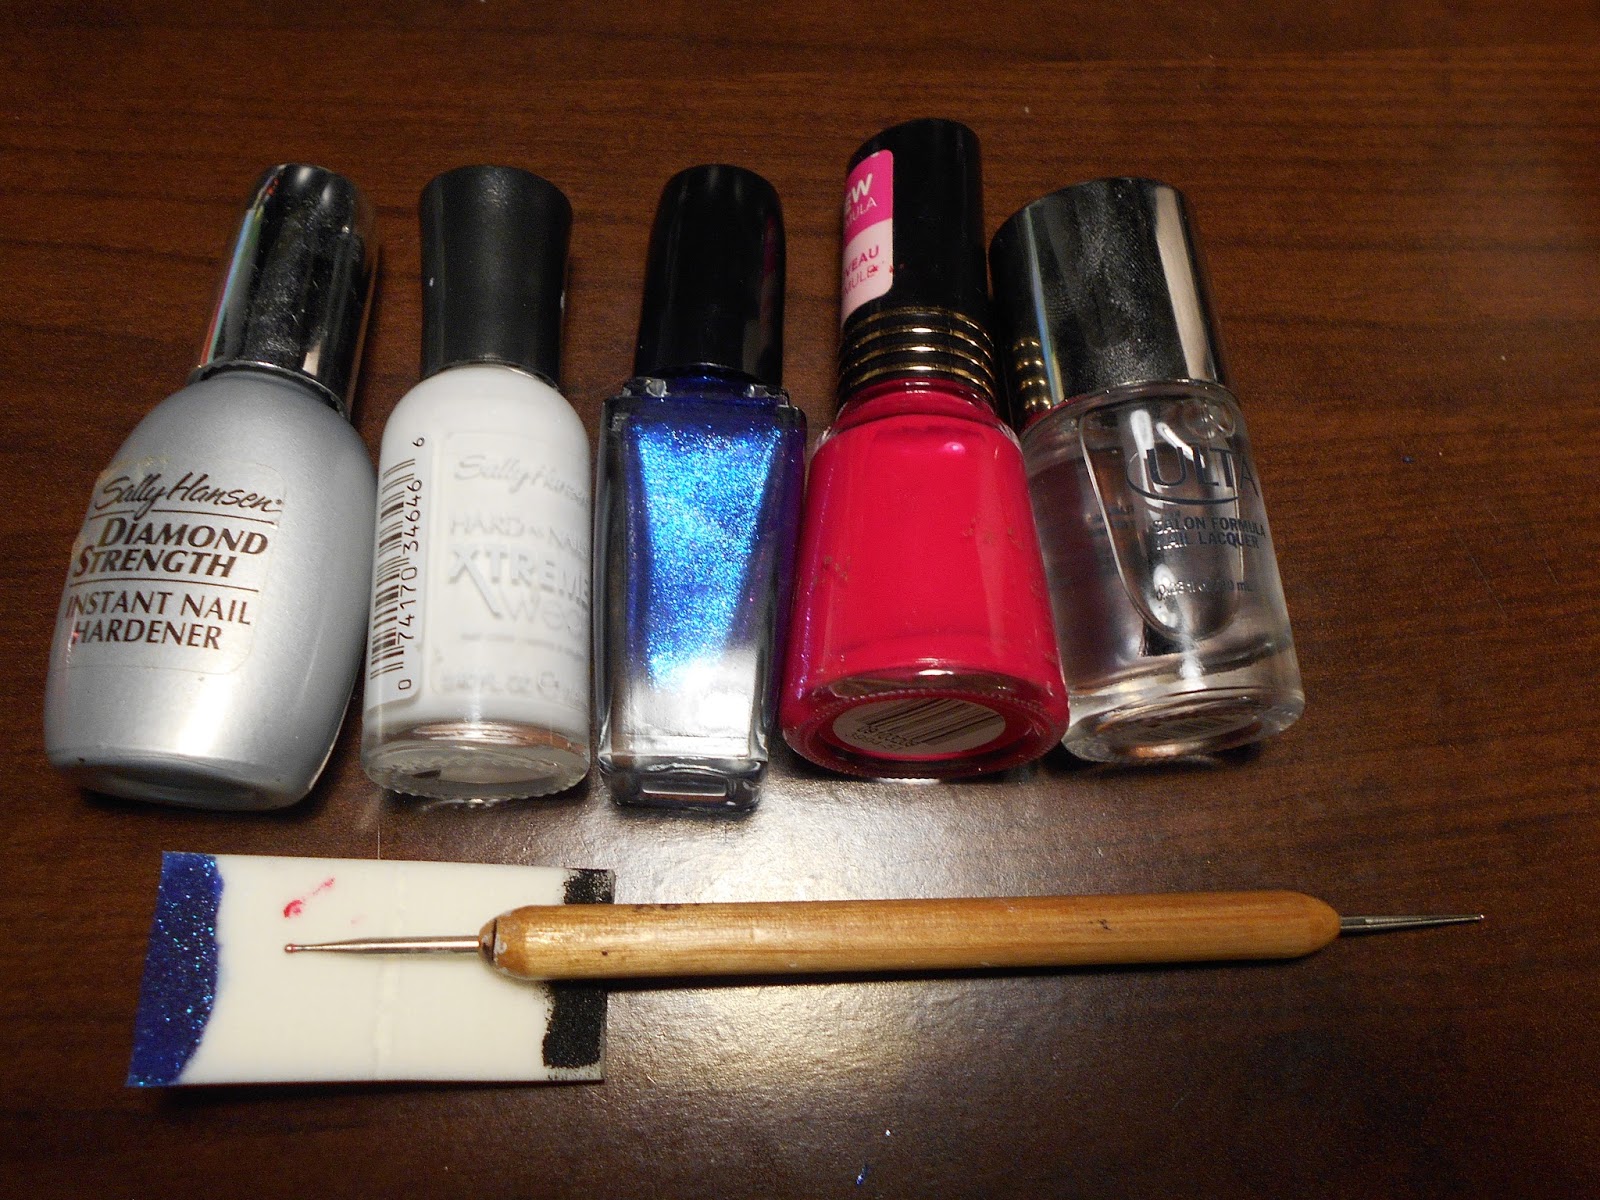
My first look was really good, I love seeing a full box. I know some people complained about the bonus hair item this month but I loved getting that hair clip. And seriously, why complain about a free extra item? It doesn't count as a sample so you still got 5 beauty samples. The theme this month is adventuring, and the inclusion of certain items definetly fit the "adventurous" theme for me at least.


SO this month I got another perfume sample, the Supergoop sunscreen sample I requested, a chemical peel, a eyeliner that isn't the fat Eyeko pen I was promised, a BB Cream, and the hair clip. This, minus the perfume, is a great box in theory for me. Some makeup, some skin care, and a nice bonus for my hair. I like well rounded boxes, where there's a bit of everything in it. More chance of finding something I like this way.


Let's start with the BB Cream. This is Marcelle's BB Cream in Golden Glow, and is your standard BB Cream with a bit of fine glitter in it. The shade isn't great for my skin, but mixed with my normal foundation it works just fine for a summer color.


This wasn't a bad product, I may have liked it more if it had been one shade lighter. It just wasn't quite what I wanted. a little to heavy for a BB Cream. But I wouldn't call this a total fail, and I am using it. A full sized is 1.6 oz and retails for $27, making my 0.24 oz tube worth $4.22. That's almost half the value of the box right there, off to a pretty good start.


This is not the Eyeko fat eyeliner we were promised. No matter how much I like or don't like this I'll still be upset that I didn't get that eyeliner. Rumor is we'll get it in a box later this summer, but I'm pretty grumpy about that to be truthful. This Marcelle liner is nice, don't get me wrong, but it isn't what I wanted. Ok, enough whining. This is a hypo-allergenic, perfume free, waterproof pencil liner, which is pretty awesome. I received the shade Indigo, which is less cool. I'd have loved the purple or even the green one they gave out, but no Miss Brown Eyes gets the blue one. Pretty sure someone at Birchbox wasn't thinking that through.


The color is lovely, don't get me wrong, I just don't wear blue anything typically. It took me about a week to actually wear the eyeliner and I don't hate it, but it really isn't my cup of tea. It has great lasting power, and applied smoothly to my eye, but I just can't get past the blue color. Maybe I need to experiment with colors more, be adventurous in that regard. This only comes in a travel pack with 3 other colors, so figuring out the price is a little tricky. I'm giving my liner a value of $4.50, which is a good valued again.


I keep getting perfumes from Birchbox, even though I specifically said I hate perfume in my profile. These literally get tested once then go straight to a friend every time. I wish they'd quite sending them to me, I'd rather have a foil packet of shampoo instead. This is the Folle De Joie perfume, and it smells like flowers squared. Not much else to say about it, I hate it and want it to go away. My little vial is worth $1.73, so it really doesn't effect the value of the box.


I selected this as my sample for the month, so if I didn't like it that would be my fault. I really love the Supergoop City  Serum Sunscreen, but I wanted to try this one to see how they compared. This is the Everyday Sunscreen, SPF 50, and is just a good whenever or where ever sunscreen. It didn't leave me greasy, didn't break me out, and I didn't get sunburned. Those are the three things I ask of every sunscreen I use. Do I like this better than the City Serum one? No, but only because the City Serum one mattifies your skin a bit, which I really liked, and has anti-aging properties. I would get a bottle of this though, I'm liking it so far. A full sized bottle is 18 oz and retails for $48, making my little tube worth 90 cents. Not a high value item at all, but I like it so that's what matters.


This is a chemical peel for your face, let that sink in for  minute. This is a chemical lotion designed to melt the dead skin from my face. That scares me quite a bit, enough that I haven't even opened the box yet. I really want to try this, but I'm way to much of a weenie to actually do it. I know it won't melt my face off, or anything like that, but I keep running that scene from Indiana Jones and the Last Crusade through my head. If I ever try it I will discuss it during a Thursday Thoughts. Or Instagram my face melting off. This single use tube has a value of $4.80, which is a decent value again.


And lastly we have my bonus item, a plastic hair clip by Sarahpotempa. This is great for holding my hair back while I do my makeup or a face mask, and even handles my Rapunzel length hair just fine. A set of two is $9.99, so I'm almost tempted to get another set ($16 for a set of 4). If these were metal instead of plastic I'd order them in a heart beat. In case you were wondering, these are almost 4 inches long. Mine is worth $4.99, and is worth every penny.

Overall my box was a miss, but not enough of a miss for me to be grumpy. I feel like Birchbox needs to look at what we are answering on our surveys and maybe quite giving us perfume or oddly colored items. And to follow through on your promises. That would be nice. The total for my box came to $21.14, so not an expensive box but I at least got my money's worth out of it. And I got 60 points for reviewing it, so not a total loss at all. I'll continue to subscribe to Birchbox just because I love them, but I'm hoping my next box makes up for this.

Tuesday, June 16, 2015

Nars Birthday Lipsticks from Sephora

While looking through all my various lip products I came to the realization that I never blogged about the two lip crayons by Nars that is the 2015 Birthday gift from Sephora. And that's a crime you guys, someone should have yelled at me and said "where's the birthday goodies post?!?!" I actually only got these and the Ulta Urban Decay Eyeliner this year (sad face), so I kind of spaced on doing a full write up. Let's just pretend this is still April and I'm not two months late on this post.


If you are part of Sephora's free rewards program, you get a free birthday gift every year. Last year was a Make Up Forever mini mascara and mini lipstick, which I found to be really cheap feeling and didn't like at all. So when they announced that this year's gift was from Nars, I was ecstatic. Nars is a very expensive brand so the chances of me every buying anything from them are slim to none. So getting two items from them (and both lip products, my personal favorite) was an awesome birthday gift. They are deluxe mini size, which if fine by me since a full sized costs a whopping $26! You receive a Velvet Matte Lip Pencil in the shade Cruella (a classic red) and a Satin Lip Pencil in the shade Rikugien (an almost shimmery neutral pink).


Rikugien is the most wearable of the two, since it is a lovely neutral shade of pink. The satin finish means it's slightly glossy, slightly shimmery. This is what I'd call an everyday shade, something you could put on to go grocery shopping or out to lunch with friends. I keep forgetting how much I like this particular shade, but every time I wear it I think I need to wear it more. I'd love to find an affordable dupe for this shade, since $26 is my total monthly beauty budget typically.


Cruella is a gorgeous red shade, and the matte finish makes it much easier to wear than a full gloss red. I don't reach for this particular red very often though, I find it uneven in how it fades and it does feather quite a bit so it takes some planning to wear. I wish this had the lasting power you typically associate with matte finishes, then I'd probably wear it at least once a week. The shade is stunning, and a matte red goes great with the retro look I like to do quite a bit.

Rikugien

Cruella
I like the crayon format but I wish they were twist up instead of needing to be sharpened. Because they are fatter than any sharpener I own I'll probably end up paying the $6 for the Nars one, unless I can find a cheaper one the right size somewhere else. I feel like needing the sharpener is a way for Nars to get even more money out of you, which is lame. You already spent $26 on the lip crayon, you'd think they'd throw the sharpener in for free. And that's my problem with these high end brands, they are so expensive and require expensive tools to use them properly. It makes them really out of reach for people like myself who don't have $100 to drop on a fancy primer than will make my $100 foundation actually look good. So while I liked these two crayons I'll still avoid Nars and their high priced makeup till I win the lottery.

Monday, June 15, 2015

Mani Monday: Grunge Edition

Hello my Budget Beauties, and welcome to this week'd edition of Mani Monday! This week's design is brought to you by my original color getting stuck and I couldn't open it, but I actually like this look better than what I originally had planned. This look is different in that I DON'T use a clear top coat, I wanted to keep the almost matte look and the interesting texture that I developed with my sponge. This is a grungy look, like metal dipped or splattered in oil. And it was crazy easy to do, so I guarantee all of you can make it work.


To do this manicure you will need:

  • Gunmetal colored nail polish. I'm using Essie brand in the shade Pin The Tassel
  • Black nail polish. I used Sinful Colors in the shade Black on Black
  • Wedge shaped cosmetic sponge. I bought a big bag of these at the Dollar Store for something last year, so I used one of those
  • Nail polish remover and q-tips to clean up the edges

Step one is to apply your gunmetal color as your base. I did two coats for mine, do as many as you need to make it nice and opaque. Let this dry completely before moving onto the next step.


Now you are going to take the black polish and apply some to the tip of the sponge, just kind of making a stripe along the edge. Lightly sponge it over the tip of your nail, doing almost a french manicure stripe of color, then gentle sponge down towards the base of your nail. This will "dirty" up the gunmetal shade and give a nice faded tip. Do this to all of your nails, and remember it's suppose to be grungy so don't worry about making them match or look even.


Once your nails are dry carefully clean up your nails then you are all done! Super quick and super easy, but I love how this looks. And as a bonus it is easy to do on your other hand, which I know can be pretty difficult sometimes. If you have to have a top coat go ahead and throw one on, but I didn't like how shiny it made this particular look. I am really loving this look and I'll be sad to take it off next weekend for next week's Mani Monday. Speaking of which, if there is a nail art design you'd like to see, please let me know down below in the comments.